
Thursday, 18 December 2014


Wednesday, 17 December 2014
Second Poster Ancillary
I have now begun the second ancillary poster, which is more the art stylistic side to my concept idea, here s what I have so far;

Ancillary Update
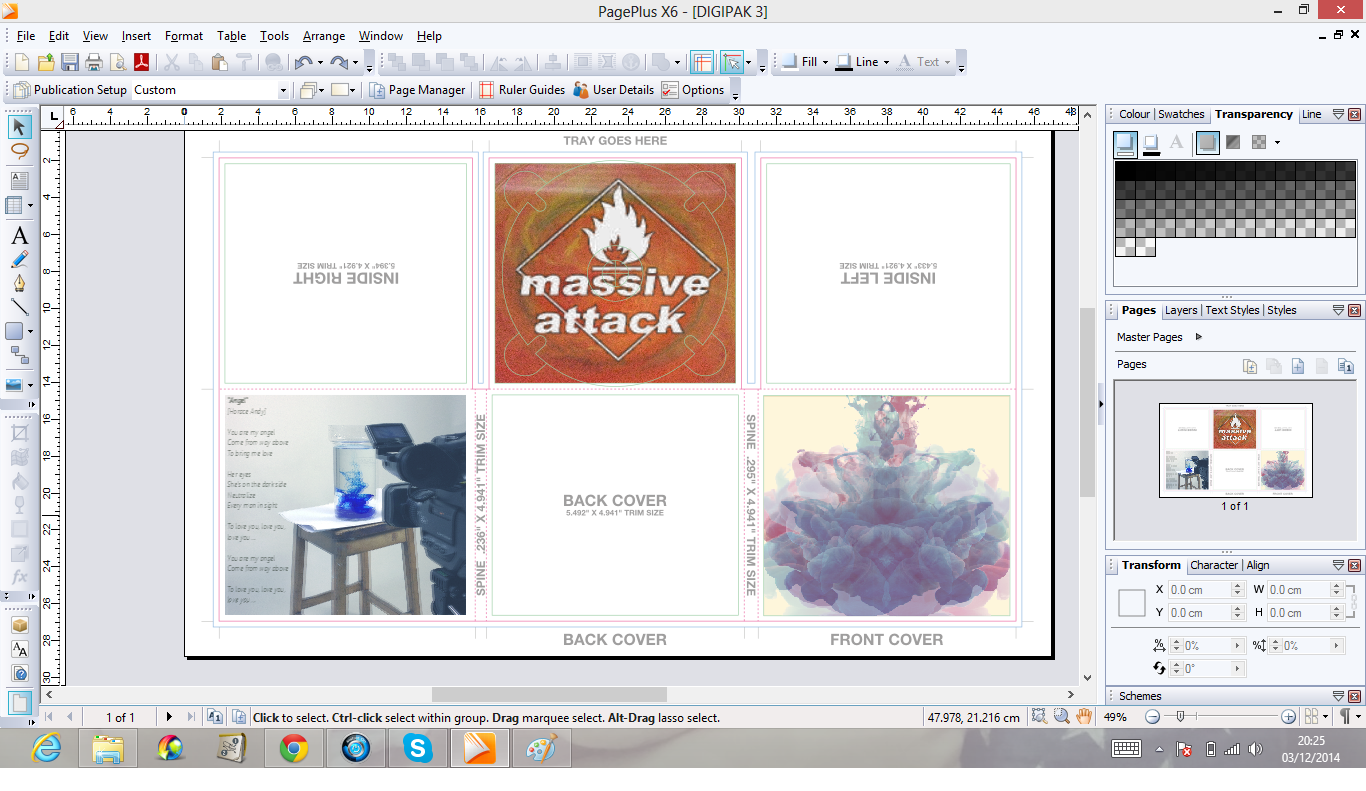
I have now added all images to my digipak an just need to do some finishing touches in order for it to be a coherent as possible;


Draft Video Before Editing
Here is my full video, however, I now need to edit certain ares and refine bits in order for it to be as professional as possible when meeting the deadline;
.JPG)
.JPG)
.JPG)
Monday, 15 December 2014
Acillary Update
I have begun playing around with typography on my poster and I have two coloured ideas that I like; I know need to decide which is best and suits the artists in the best way.


Ancillary Update
I have begun the colour change on my poster and added the artists name - I now need to add the release date and possibly the singles name. So far I am very pleased with the poster and I believe it is on its way to becoming very successful.

Digipak Update
I have reworked my digipak and a now a lot happier with the result - I have filled in all the panes other than the back as I am yet to edit my lip sync footage.
Here is my digipak so far;

Here is my digipak so far;
Digipak Update
I have begun the colour change process into black and white in order to keep continuity throughout my work. However I am still unhappy with the inner centre pain and so I may have to rethink what image to place there.

Friday, 12 December 2014
Lip Sync Original Footage
When recording the lip sync I filmed the song around 5 times in order to ensure that I have enough footage during editing. The first recording it was kept simple and straight forward, from there I then worked on how I wanted the lips to move and what to represent.
Here is some of the original footage from this day of recording;
Here is some of the original footage from this day of recording;
Lip Sync filming
Set Up of Camera and room layout;


In order for editing to be as straight forward as possible, I will be painting the area around the lips white, therefore it will blend more smoothly into the background walls - similar to a green screen however the will just remove the back ground, and by having the face and walls the same colour, it will be easier. This is the face paint I will be using;

.JPG)
In order for editing to be as straight forward as possible, I will be painting the area around the lips white, therefore it will blend more smoothly into the background walls - similar to a green screen however the will just remove the back ground, and by having the face and walls the same colour, it will be easier. This is the face paint I will be using;
Digipak Update


I am now beginning to position the screen grabs into my inner right and left panes. However, upon re looking at my digipak I am unhappy with the inner centre and back panes, therefore I will have to re work those pains.
Change to Story Board
In my story board I stated that I wanted to include a medium shot of three tanks, each having ink dripped in one after the other. However, when putting together my video, I have come to realise that it doesn't fit very well - the before and after clips flow smoothly and fit perfectly to the music however this shot doesn't. Therefore, I have decided to remove it all together and place it with something else.
What I am replacing it with is still a medium shot, however it is of one cylinder and the ink is already placed within it.
In order to match it with the three beat sound, I cut out small chunks of the footage in order to create a jumping effect in the track. As this beat happens on more then one occasion I have added the same footage in twice. Nevertheless, in order to not bore my audience, the second time it is played, it is seen in reverse - almost like time is being messed around with. This in itself represents the drug infused Bristolian Saga as tim was always blurred and unknown.
Music Video Update
I am now filling in the gaps for my music video - so far I have filled 20 seconds of the 50 to go and now just need to transfer the rest of my work in order to use my other footage for those 30 seconds.
Overall I am very please with my music video, although I still believe refining is needed as a few places just don't quite sit well in the piece.
Overall I am very please with my music video, although I still believe refining is needed as a few places just don't quite sit well in the piece.
Thursday, 11 December 2014
Video Transfering
Due to technical difficulties during the production stage, I had to put half of my footage onto a separate mac and transfer the work over. Although this wasn't a massive hinder towards the editing stages it has ever so slightly slowed down this process - as there is so much footage to transfer.
Music Video update
I have begun filling in the gaps from my draft 3 video, and placing what clips I want where before I edited each part. I believe if I add the wanted clips first than edit them I can control my time better then editing as I go. I have now filled in and extra 30 seconds and the final ink drop at the end of my video is coming together to create a more intense effect - matching with the beat.
Tuesday, 9 December 2014
Digipak Update
I have now begun work on my left and right inner pane of my digipak, and so far I have collected 12 screen grabs to place into it. Although some are differing colours because of the inks used during production, I am able to easily colour correct them to be all black/white and matching.
Overall I am please with these two panes as I believe will come out really effectively.
Overall I am please with these two panes as I believe will come out really effectively.
Saturday, 6 December 2014
Music Video Update
Editing the colour to black and white - I have now begun this process and the video is coming along together nicely - It now looks more like a music video as opposed to compilation video.
Here is the full song, with the filled in bits I have completed
https://www.youtube.com/watch?v=_35L4WGsdDY&index=4&list=UUk7NdMhxtYe88NiWxjL9mEg
Here is the full song, with the filled in bits I have completed
https://www.youtube.com/watch?v=_35L4WGsdDY&index=4&list=UUk7NdMhxtYe88NiWxjL9mEg
Friday, 5 December 2014
Underlay of lip sync
I chose the grey and black colouring as I wanted to create a darker tone to the piece,
"Her eyes, she's on the dark side" - by using the colour scheme this allows for the audience to believe that being someones 'angel' isn't necessarily a good quality, thus the sensual and dangerous aspects of the lips are then reflected upon the ink (the audience)
Here is the first colour editing before inverting the colour tint;
Thursday, 4 December 2014
Change to 28 seconds "Pan"
I decided during editing to change the panning effect around the tank as I felt the new effect I had created allowed for a more professional edit.
I took the main footage for the ink, I then cut every other section out to create the jumping effect. This was my result (I now need to edit the colour in order for continuity to be in place)
I took the main footage for the ink, I then cut every other section out to create the jumping effect. This was my result (I now need to edit the colour in order for continuity to be in place)
Music Video Update
During my recent work of my music video I edited the text for both; the name of the song and the title of the artist. Upon researching I found that Massive Attack were unconventional and used their typography to their artistic advantage - I its for that reason I used the song title "Angel" to match the beat of the song - around 10 seconds the first underlying beat of a metronome driving the music forward.
I then, when the high pitched (almost screeching) beat comes to play - I placed Massive Attacks title in white typography in order to contrast the dark and sudden colour change that the beat causes.


Wednesday, 3 December 2014
Ancillary Poster Beginning Stages
My first poster will be the same as the front pane of my digipak, I now need to add the release date. I want to keep the poster minimal as possible, therefore it will create an enigma code and the audience will want to know more, thus establishing a secondary active audience.


Digipak Update
I decided to copy the image used and flip it - I did this as I felt it create a better ink effect, additionally it emphasised the haziness of the Bristolian Sage;


From this I then went on to add the logo - during experimenting with layouts, I decided to cover the entire pane with the logo, however by erasing the inner of the logo I was able to create a window for the ink to show through;
Friday, 28 November 2014
Editing First Stages
Now that I have finished the recording for my music video, I am now able to start putting the pieces together and editing the footage; and after three hours of uploading and beginning the editing I have successfully created 36 seconds of the video.
.JPG)

Getting used to Final Cut Pro isn't as difficult as first thought, I was afraid that I would spend more time figuring out the software then actually editing the video. However, this hasn't been the case and the editing process has been smoother than first thought.
Here are some images from the editing process;
Thursday, 27 November 2014
Fourth Day of Production
Originally I was book a two hour set in the studio, however, I was able to capture all the missing pieces from my video within an hour. This allowed me to jump straight into editing and start piecing together all my footage - of which is over 50 + minutes worth of film.
.JPG)
.JPG)
.JPG)
.JPG)
.JPG)
.JPG)
Tuesday, 25 November 2014
Filming the Lips
When it comes to filming the lips I will do this in my own ome with the same camera I have been using for all my footage. I will place a white piece of paper behind me wih a light facing me, this way the brightness will counteract and the shoot will be lghter.
Red lipstic will also be used to create the dark and seductive side to the Bristolian saga. As it will be done over the wekend I will be able o spend a whole day wrking on timings and positioning. I aim to have 3 - 5 different recordings of the song all together, therefore during editing I will have enough footage to work with and can use the best of the filming.
Red lipstic will also be used to create the dark and seductive side to the Bristolian saga. As it will be done over the wekend I will be able o spend a whole day wrking on timings and positioning. I aim to have 3 - 5 different recordings of the song all together, therefore during editing I will have enough footage to work with and can use the best of the filming.
Change to Digipak Front Pane
Upon looking at the front pane, I still wasn't happy with the shadow effect and the contrasting, Therefore, I have re - faded each image layering and the brightness/contrast. This is the rework of that;
 I will now go onto create a background and depending on how the shadow effect works on this image, I will consider whether to remove the shadow all together.
Thursday, 20 November 2014
Third Day of Production
After my third day of production I now have 40 + minutes of footage. therefore in my editing process I am able to choose the best pieces to put forward into the video itself. Over all I have now become very confident with my filming and how all the ink and technical aspects work. It is also for this reason that I felt this session was the most successful out of the three.
.JPG)
.JPG)
.JPG)
.JPG)
.JPG)
Dolby
You are documenting your 'journey' really well here. I think your reflective comments are valuable. Just now consider the other ancillary task and the idea of sharing colours/images across all 3 products. Don't forget it's all original images too in the final product- document the images when you have taken them.
Wednesday, 19 November 2014
Colour Change to Inner Centre Pane


As I wasn't fully happy with the colour choice of the inner centre pane, I decided to play about with colouring. I therefore, went back to the original image and started from scratch, however I kept to the original orange colouring with only changing the contrast and brightness levels.
Although I prefer the new centre pane, I am still unsure of its placement and colouring. I will have to question my target audience on what they prefer if any.
Friday, 14 November 2014
Change to Digipak Front Pane

I feel as though this layering looks better than my origonal attempt, I now need to add shading to the background and colouring, to make it have a better sense of verisilimitude.
Digipak Front Pane beginning stages
For the front pane I wanted to overlay multiple ink captures, however as it is beginning stages I am still working on how to layer them in the most effective way. When looking at the image like this I feel I need to blend the main drop into the others more as it looks far to rigid and not flowing.
Once I have figured that out I will then add the finishing touches of the artists name and the title of the single.


Subscribe to:
Comments (Atom)